Before
热更新是开发过程中必不可少的功能,想象一下开发一个表单,好不容易填完了所有信息,提交发现逻辑错误,改完代码发现页面刷新了,要挨个重填一次,
直接原地qushi,而有了热更新,页面的状态就都能保留,极大地提升开发效率。
用了这么多年热更新,是时候来理一理它的原理了。
环境
搭了一个最简单的能热更新的环境。
if (module.hot) {
  module.hot.accept('./hello.js', function () {
    div.innerHTML = hello();
  });
}index.js文件中如果没有这段代码,更新hello.js文件后,页面自动刷新,展示更新后的内容, 如果加上这段代码,更新hello.js文件后,页面不刷新,但是界面的内容会更新。 (可以通过在input框中输入内容来判断是否刷新了页面。)
问题
我们先将热更新拆解为几个部分,逐个分析。
首先是监听文件修改,那么是谁监听,监听到修改后做了什么?
其次是谁?如何通知到浏览器?
最后浏览器做了什么?
先简单解答一下每个问题:
首先是webpack监听到文件修改后,进行编译,打包出新的文件,得到新的hash。
其次是webpack-dev-server通过websocket通知浏览器,告诉浏览器新的hash。
浏览器收到通知后,请求新的文件,拿到新的文件后,更新页面。
文件监听
webpack是如何实现监听文件修改的呢?答案是使用了node的fs.watch方法。
const fs = require("fs");

function watchTest() {
  const filepath = '/Users/ever/Documents/learning/env/node/'
	const watcher = fs.watch(filepath);
	watcher.on('change', (type, filename) => {
		console.log('changed', type, filename);
	})
}

watchTest()执行watch.js,当修改了filepath目录下的某个文件后,控制台就会输出对应的文件名称。
webpack在监听到文件变化后,最终会走到Watching.js中对文件重新进行编译打包,然后输出到内存中。
this.compiler.hooks.watchRun.callAsync(this.compiler, err => {
  if (err) return this._done(err);
  const onCompiled = (err, compilation) => {
    ...
  };
  this.compiler.compile(onCompiled);
});读过webpack源码的小伙伴应该会对这段代码很熟悉吧,在一次正常的编译流程中,会在run钩子中执行Compiler的compile方法, 创建Compilation,开启整个编译过程。忘记了可以看 webpack5源码之旅 - 初始化复习一下。
将文件打包到内存中
通过webpack-dev-server启动后,会发现项目目录下并没有生成新的文件,但是访问页面我们能发现它请求到了bundle.js文件,那么这个文件在哪儿呢?
答案是在内存中。
webpack-dev-server中使用了webpack-dev-middleware作为一个打包器,它内部使用了memfs将文件放入内存。使用express启动服务器读取内存中的文件。
下面写了一个简单的例子,执行node代码,访问localhost:4000,就能看到页面,在network中可以看到请求了bundle.js文件。
const express = require('express')
const app= express()
const fs = require('memfs')

const port = 4000

fs.writeFileSync('/bundle.js', '"use strict";eval("const div = document.createElement(\'div\');div.innerHTML = \'hello\';document.body.appendChild(div);")')

app.get('/', (req, res) => {
	res.send('<!DOCTYPE html><html lang="en"><head><meta charset="UTF-8"><title>Document</title></head><body><div>nice</div><input /><script src="/bundle.js"></script></body></html>')
})
app.get('/bundle.js', (req, res) => {
	const fileRes = fs.readFileSync('/bundle.js', 'utf8');
	res.send(fileRes)
})
app.listen(port, () => {
	console.log('4000 started')
})通知浏览器
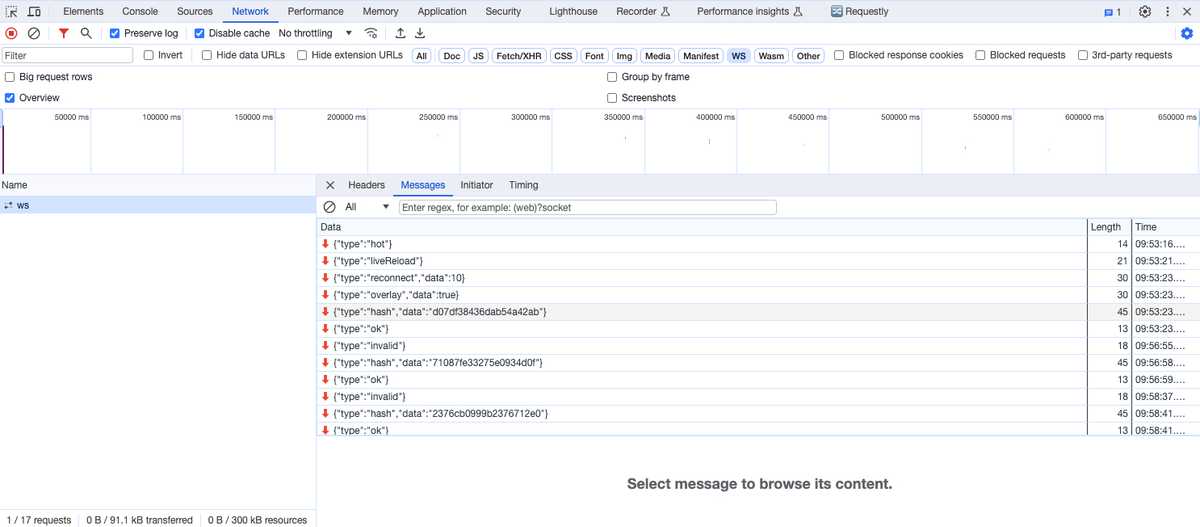
服务器与浏览器之间通过websocket建立长连接。当重新编译完成,服务端就会发送新的hash给浏览器。
_done(err, compilation) {
  ...
  this.compiler.hooks.done.callAsync(/** @type {Stats} */ (stats), err => {
    ...
  });
}this.compiler.hooks.done.tap(
"webpack-dev-server",
(stats) => {
if (this.webSocketServer) {
this.sendStats(this.webSocketServer.clients, this.getStats(stats));
}
this.stats = stats;
}
);
sendStats(clients, stats, force) {
...
this.currentHash = stats.hash;
this.sendMessage(clients, "hash", stats.hash);
...
this.sendMessage(clients, "ok");
}websocket
如何建立websocket连接呢?
分两部分,服务端和客户端。服务端使用node+ws,客户端使用浏览器提供的WebSocket。
const Websocket = require('ws');

const implementation = new Websocket.Server({path: '/ws', port: '3000'});

implementation.on('connection', (client) => {
	console.log('connection');
	client.on('message', (msg) => {
		console.log('received', msg);
	})
})执行server.js就能启动ws
const client = new WebSocket('ws://localhost:3000/ws');

client.onopen = () => {
	console.log('open')
	client.send('connected');
}

client.onmessage = (msg) => {
	console.log('msg', msg)
}可以在控制台直接执行client.js中的代码,建立ws连接,发送消息。
HMR
当收到ok消息后,会调用reloadApp,如果配置了热更新,就会调用 webpack/hot/emitter 将最新 hash 值发送给 webpack
import hotEmitter from "webpack/hot/emitter.js";

function reloadApp(_ref, status) {
  var hot = _ref.hot, liveReload = _ref.liveReload;
  ...
  var currentHash = status.currentHash, previousHash = status.previousHash;
  ...
  var allowToHot = search.indexOf("webpack-dev-server-hot=false") === -1;
  if (hot && allowToHot) {
    log.info("App hot update...");
    hotEmitter.emit("webpackHotUpdate", status.currentHash);
    ...
  }
  ...
}hotEmitter.on("webpackHotUpdate", function (currentHash) {
lastHash = currentHash;
if (!upToDate() && module.hot.status() === "idle") {
log("info", "[HMR] Checking for updates on the server...");
check();
}
});
var check = function check() {
module.hot
.check(true)
.then(function (updatedModules) {
...
})
.catch(function (err) {
...
});
};调用module.hot.check方法,这部分代码被打包在bundle.js中。 module是bundle.js中定义的有一个全局变量
__webpack_require__.i.push(function (options) {
	var module = options.module;
	...
	module.hot = createModuleHotObject(options.id, module);
});
function createModuleHotObject(moduleId, me) {
  /******/
  var _main = currentChildModule !== moduleId;
  /******/
  var hot = {
      ...
      active: true,
      accept: function(dep, callback, errorHandler) {
        ...
        hot._acceptedDependencies[dep] = callback || function() {}
      },
      check: hotCheck,
      apply: hotApply,
      ...
  };
  ...
  return hot;
}module.hot.check也就是hotCheck方法:
function hotCheck(applyOnUpdate) {
  ...
  return setStatus("check")
  .then(__webpack_require__.hmrM)
  .then(function(update) {
      ...
      return setStatus("prepare").then(function() {
            return Promise.all(
              Object.keys(__webpack_require__.hmrC).reduce(function (
              			promises,
              			key
              		) {
              			__webpack_require__.hmrC[key](
              					update.c,
              					update.r,
              					update.m,
              					promises,
              					currentUpdateApplyHandlers,
              					updatedModules
              				);
              			return promises;
              		},
              	[])
          ).then(function() {
              return waitForBlockingPromises(function() {
                  ...
                  return internalApply(applyOnUpdate);
              });
          });
      });
  });
}
__webpack_require__.hmrC.jsonp = function(
  chunkIds,
  removedChunks,
  removedModules,
  promises,
  applyHandlers,
  updatedModulesList,
) {
    applyHandlers.push(applyHandler);
    ...
    chunkIds.forEach(function(chunkId) {
        if (
        __webpack_require__.o(installedChunks, chunkId) &&
        installedChunks[chunkId] !== undefined
        ) {
            promises.push(loadUpdateChunk(chunkId, updatedModulesList));
        }
    });
}
;__webpack_require__.hmrM中fetch到新的[newHash].hot-update.json文件; 执行__webpack_require__.hmrC.jsonP,传入.json文件中返回的key,通过jsonp方式得到[key].[newHash].hot-update.js,并执行。
"hello.js": ((__unused_webpack_module, __webpack_exports__, __webpack_require__) => {
  eval("下面部分是eval中转成可执行的代码")
})
__webpack_require__.r(__webpack_exports__);
/* harmony export */
__webpack_require__.d(__webpack_exports__, {
  /* harmony export */
  "default": () => (__WEBPACK_DEFAULT_EXPORT__)
  /* harmony export */
});
const hello = () => {
  return 'hello world nice to meet you-2'
}
/* harmony default export */
const __WEBPACK_DEFAULT_EXPORT__ = (hello);将模块代码更新,下次调用的时候就能调新的代码了
function internalApply(options) {
  ...
  var results = currentUpdateApplyHandlers.map(function(handler) {
      return handler(options);
  });
  results.forEach(function(result) {
      if (result.apply) {
          var modules = result.apply(reportError);
          ...
      }
  });
  ...
}
apply: function(reportError) {
    ...
    // call accept handlers
    for (var outdatedModuleId in outdatedDependencies) {
        if (__webpack_require__.o(outdatedDependencies, outdatedModuleId)) {
            var module = __webpack_require__.c[outdatedModuleId];
            if (module) {
                ...
                for (var j = 0; j < moduleOutdatedDependencies.length; j++) {
                    var dependency = moduleOutdatedDependencies[j];
                    var acceptCallback = module.hot._acceptedDependencies[dependency];
                    callbacks.push(acceptCallback);
                }
                for (var k = 0; k < callbacks.length; k++) {
                    /******/
                    try {
                        callbacks[k].call(null, moduleOutdatedDependencies);
                    }
                    ...
                }
            }
        }
    }
    ...
}最后执行apply方法,执行module.hot._acceptedDependencies中的回调函数,这个回调函数就是我们在业务代码中定义的回调函数。
业务端配置
上面已经替换为新的模块代码了,但是业务端并不知道,所以需要调用module.hot.accept方法,添加模块更新后的处理函数。
在业务代码中定义需要热更新的模块以及回调函数:
if (module.hot) {
  module.hot.accept('./hello.js', function () {
    div.innerHTML = hello();
  });
}./hello.js作为key,回调函数作为value存放在hot._acceptedDependencies中。
当然开发时不可能每个文件里面都去写module.hot.accept,一般框架都会帮你把这部分代码一起打包到js中。
总结
对整个热更新流程做一个简单的总结:
通过fs.watch监听文件修改,在回调函数中进行再次编译,将新的模块js代码写入内存中,同时生成一个新的hash。
启动阶段,webpack-dev-server会建立一个ws服务。客户端连接ws服务的代码被一起打包在输出js中,在访问界面后执行(可以在network中查看到)。
服务端通过ws将新的hash值发送给客户端(浏览器),最后发送一个ok消息,客户端收到ok消息,执行reloadApp方法。
reloadApp中通过webpack/hot/emitter将新的hash告知webpack,webpack中执行module.hot.check方法,这些也都打包在输出js中。
执行check方法,fetch到[hash].json文件得到一个key,在通过jsonp方式请求[key].[hash].js并执行。这样modules中的模块就是更新后的代码。
后续会通过被修改module的key,在module.hot._acceptedDependencies找到回调函数并执行,从而完成对界面的更新。
而这对key、value是通过module.hot.accept方法进行存储的,一般框架都会把这段代码打包进输出js中,如果没有使用框架,
那么就需要手动在需要热更新的模块中添加这段调用module.hot.accept方法的代码。
Reference
1. 简单聊聊前端开发中的热更新原理
2. 面试官:说说webpack的热更新是如何做到的?原理是什么?
3. Webpack HMR 原理解析
4. 搞懂webpack热更新原理
5. 4-5 使用自动刷新
6. 基于Node.js实现WebSocket 服务器
7. 10-Vite 中的 HMR 热更新
8. Webpack 原理系列十:HMR 原理全解析
